Dependency Injection Part 1 - Sat, Sep 4, 2021
Bootstrapping
Part 1: Bootstrapping <– (You are here!)
Note: This project will be done entirely in C#, if you want to follow alone in your own language like Java, you will probably need to do some googling on how to perform specific parts where I reference .Net specific libraries. Ill try to only do this when absolutely necessary.
To start, ensure you have Visual Studio 2017 installed, you can get a free copy of the Community Edition here.
Next, use whatever your preferred Git tool is and download a copy of the starter repo.
You should be able to follow along with my Commits to the repo as we go, just take a look at the commits to master to get an idea for it. It should be noted you *will not be able to push anything to these branches, of course. If you want to use source control you will of course need to fork the repo in order to actually commit.
This, of course, won’t be necessary, but I am still expecting to see dozens of forks of the project without any commits anyways because such is GitHub. Anyways.
Step 1: Organization
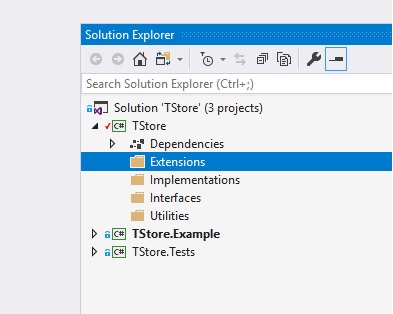
I like to use the following organization for my projects, my main project just has the usual name and houses all the standard logic, classes, etc. The ‘Tests’ project will have all of our Unit tests (we’ll get to that later) and the Example project is for people to look at to get a feel for how to use the project.
To begin, lets make some folders in the main ‘TStore’ project to start out organized. It should look something like this

- Extensions: This will be the folder we put any static class extensions of interfaces/classes
- Implementations: We will put our classes in here
- Interfaces: As the name implies, all interfaces go in here
- Utilities: This last folder will just hold the various other stuff that doesnt fit anywhere particular. Constants, Enums, etc.
This is how I like to organize myself in C# but you are more than welcome to do it your own way, whatever works for you!
So to start let’s start by breaking down the usual DI Container flow.
Step 1: Instantiate a new DI Container with some form of Configure class system, which is used to start setting everything up.
Step 2: Call some form of Get method on the container, passing in a type, and it will try and find something registered to that type based on prexisting config
And that’s really all there is to it! It’s really simple actually, so let’s start by defining our interfaces and implementing them. We probably also want a means to check if something is registered already and the ability to unregister an object from a type as well!
|
|
|
|
Easy enough. The Register methods for the Store are all pretty straightforward. We want to use a dictionary which holds a list of mapped types really, and thats about it.
|
|
Now for the tricky part, the Fetch method. The key to this will be two .Net system methods (This part in particular you will have to look up how to do in other languages since they will probably be very different from C#)
First, Type.GetConstructors, which gets us a list of ConstructorInfo objects, which contains a list of ParameterInfo objects, which we can fetch those types from, and recursively call Fetch on those ones once we find the best match.
Second, System.Activator, which is the global machine that builds instances of all objects in your program, we’re going very low level here and calling it directly. You can pass in a list of params you know and it will find the best constructor matching those params, but we’ll do a bit of pre-caching here to help that speed up.
It sounds like a bit much but this is basically the entire DI container and after this step, our DI system will be completely functional already!
|
|
Step 2: Try it out! At this point we have a functional DI Container, you can test this out by creating the following services Implementations + Interfaces in your Example project (Make sure you’re Example project has a reference to the Core Project!):
|
|
And finally we will Register these two services in our Main method and use them, and if all worked well we should see ‘Hello World!’ on our console!
|
|
Thanks for reading and check out Part 2 where we build a bunch of handy extension methods for our interface to make life a lot easier (and make our example look a lot less messy!)